
Examining documentation and help systems since 2002
Contents
Special Reports
Reading Usable Help
@UsableHelp on Twitter
Gordon R. Meyer
Copyright 2002-2015
Favorite Sites
Grammar Girl's Quick and Dirty Tips for Better Writing
A look at Ionic Breeze's embedded help
But UI Text isn't limited to software. The latest version of the Sharper Image Ionic Breeze GP air filter has some text to assist customers in removing the dust collection grid.
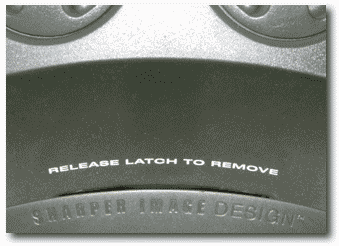
The issue that's being addressed is that a latch must be pressed before the grid can be lifted out of its housing. I have earlier versions of the Ionic Breeze and this text does not appear on those units. It's only present on the newest unit which was built in February 2003. It's interesting to reverse-engineer why this UI Text might have been added.
The first Ionic Breeze GP did not have the collection grid latch so no text was necessary. I think they added the latch because a critical step in cleaning the unit is to rotate it upside down. (This causes glass beads to fall and scrape the ionizer wires.) However, if the grid is installed when you tip the unit it would fall out and probably get damaged.
The Ionic Breeze manual says to turn over the unit without having the grid in place, but the instructions could emphasis this more by having the user invert the unit immediately after removing the grid. The intermediary step of wiping off the grid encourages its immediate return to the unit because once it is clean it is natural to put it back into place. Particularly if the reader is only looking at the pictures, not reading the text.

My second Ionic Breeze has a latch to hold the grid, but does not have the UI Text. If you put your fingers all the way under the lip of the grid before lifting it, you'll naturally press and release the latch. But if you try to lift the grid by its lip you'll find that it is impossible to move.
I'm betting they got a lot feedback from frustrated customers who couldn't remove the grid. The latch is well designed, but it's not discoverable to those who don't put their fingers under the lip. Unfortunately, when they added the latch Sharper Image chose not to update the documentation to reflect the new procedure for removing the grid. Nor is it mentioned in the videotaped "cleaning instructions" that come with the unit. It's also omitted from their FAQ which says "Simply slide out the collection blades..".
Thus we end up at the third generation which silkscreens instructional text on top of the unit. It is a good addition because it clues you into the fact that there is a latch, but if you're unable to find it you won't get any assistance from the product's ample documentation. That's a shame. Perhaps Sharper Image will finally get it right on their fourth attempt. One also has to wonder if the cleaning documentation had been designed to better describe the actual sequence of steps then the need for a latch could have avoided all together.