
Examining documentation and help systems since 2002
Contents
Special Reports
Reading Usable Help
@UsableHelp on Twitter
Gordon R. Meyer
Copyright 2002-2015
Favorite Sites
Grammar Girl's Quick and Dirty Tips for Better Writing
Using background images in Mac OS X
Rather than simply hope that the customer will know what to do, it's a good idea to give some instructions about how to proceed. Typically this is done in a "read me" text document. Unfortunately, much of the information in a typical "read me" has little to do with installing or using the software. It seems that once a "read me" exists, it is almost impossible to resist the temptation of overloading it all sorts of information. It's little wonder that many users disregard them.
An interesting alternative technique on Mac OS X is to use the Finder's View Options to put an instructional image in a window's background. For example, when you download the game iConquer, the background of its disk image (a virtual disk, think of it as a locked folder for our purposes) looks like this:
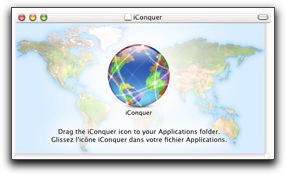
The text reads "Drag the iConquer icon to your Applications folder." Very succinct. There is room for improvement, but it is much better than a convoluted text file.
Here's another example, from Iconographer. While very attractive, the addition of the website and email addresses, and the (redundant) version number are reminiscent of the Read Me trap -- we've got room, let's add more!
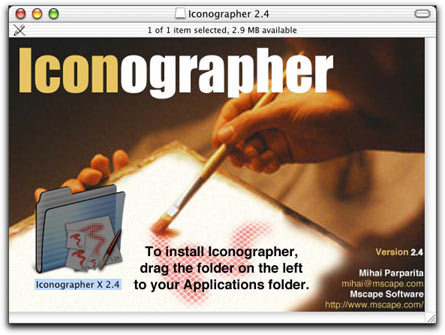
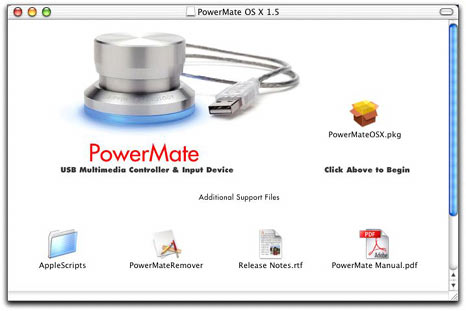
The issue I have with the addresses is that they're not very usable. The disk image is transitory and unlikely to be around for easy reference, and in this format the addresses are not "clickable." To make them clickable, location files could be used instead. But adding too many files to the window can introduce confusing clutter, as in this example from PowerMate.
Background images certainly let you dress up the otherwise plain appearance of a Finder window. The previous examples are simple but effective designs, but the image used for Watson really stands out.
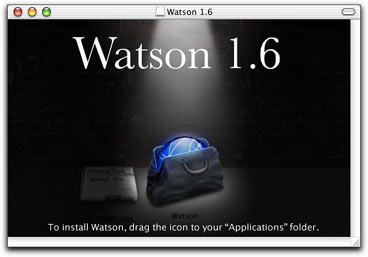
The dramatic artwork works well with the application icon, which is carefully placed in the beam of light that surrounds it. However, the Read Me document that lies in the shadows is easily missed or mistaken as being part of the picture. (It's probably just as well.)
As touched on earlier, wording the instructions that appear in the image is tricky. Both Watson and NetNewsWire Lite use the word "install" which, while jargon, provides a rationale for the doing the task. (Most applications will still work if opened from the disk image, so there is no technical requirement that forces users to pay attention to this step.)
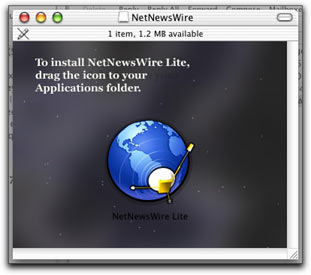
Better still would be to extend the instructions to tell users that they need to open the copy that they've put in the Applications folder, not the one on the disk image. This will help teach them where to find the application later. (A nuance that often confuses novices.)
Mac OS X has strong multilingual capabilities, but there's no provision for using different background images based on the user's language settings. If you're supporting users in more than one language you'll need to include all the translated text in a single image. (Notice that iConquer includes both French and English.) Putting too much instruction in the image will be awkward if you include multiple translations. Finding the right balance will be a challenge.
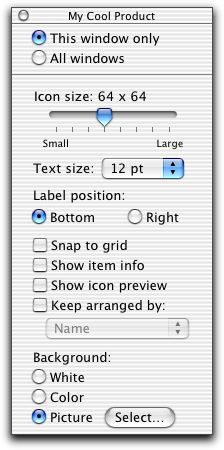
How do you add a background image? They're done on a per-window basis. After you've created your unlocked disk image, copy the graphic that you want to use for the background to the image. Double-click the disk image's icon to open a Finder window for it, then choose Show View Options from the Finder's View menu. Click the radio button to specify that you're changing the view for this window only (instead of all windows) then change the Background setting to Picture. When you select the picture file, be sure to choose the copy that is one the disk image, not a copy elsewhere on your hard disk.)
Next, open Terminal and use the /Developer/Tools/SetFile command to make the image file invisible. This isn't required, but it adds a professional touch. See the man page for SetFile for details. Finally, eject the disk image, then use Disk Copy to convert it to compressed (read-only) format.
With these few steps, you're well on your way to helping your customers get started with well-placed, attractive, and easy-to-follow instructions. Developers are just beginning to tap into this capability, and while certainly not perfect, with a little thought and focus you can improve your customer's initial experience with your product.